BugBunny.ai • July 13, 2026 • 5 min read
How to Use BugBunny
BugBunny works best when you give it an authorized target, add only the context the agents genuinely need, and then let the system run. You do not need to write a long security prompt or manage the test step by step.
The short version
Our own workflow is intentionally simple: start a fresh scan, enter the target, usually leave the optional notes empty, and wait for the agents to finish. If the application requires a login or other browser state, attach the original, unsanitized HAR file so the scan starts with the same authenticated context you have. Do not remove its cookies, authorization headers, tokens, or relevant request data.
01
Enter the target
Use the URL or IP address of a system you own or are explicitly authorized to test.
02
Add context only when it helps
We normally leave scan notes empty. For an authenticated application, attach the original, unsanitized HAR. It must retain the session cookies, authorization headers, auth or bearer tokens, CSRF tokens, and relevant request data the agents need to use the logged-in session.
03
Start the scan and let it run
BugBunny handles reconnaissance, enumeration, exploitation, verification, deduplication, and reporting without needing step-by-step prompts.
04
Review the findings
Open the final report for verified issues, evidence, reproduction details, and proof-of-concept material.
05
Run a fresh scan when needed
If the result does not meet your expectations, our usual approach is to start another scan rather than steer the old one through follow-up messages.
The New Audit screen
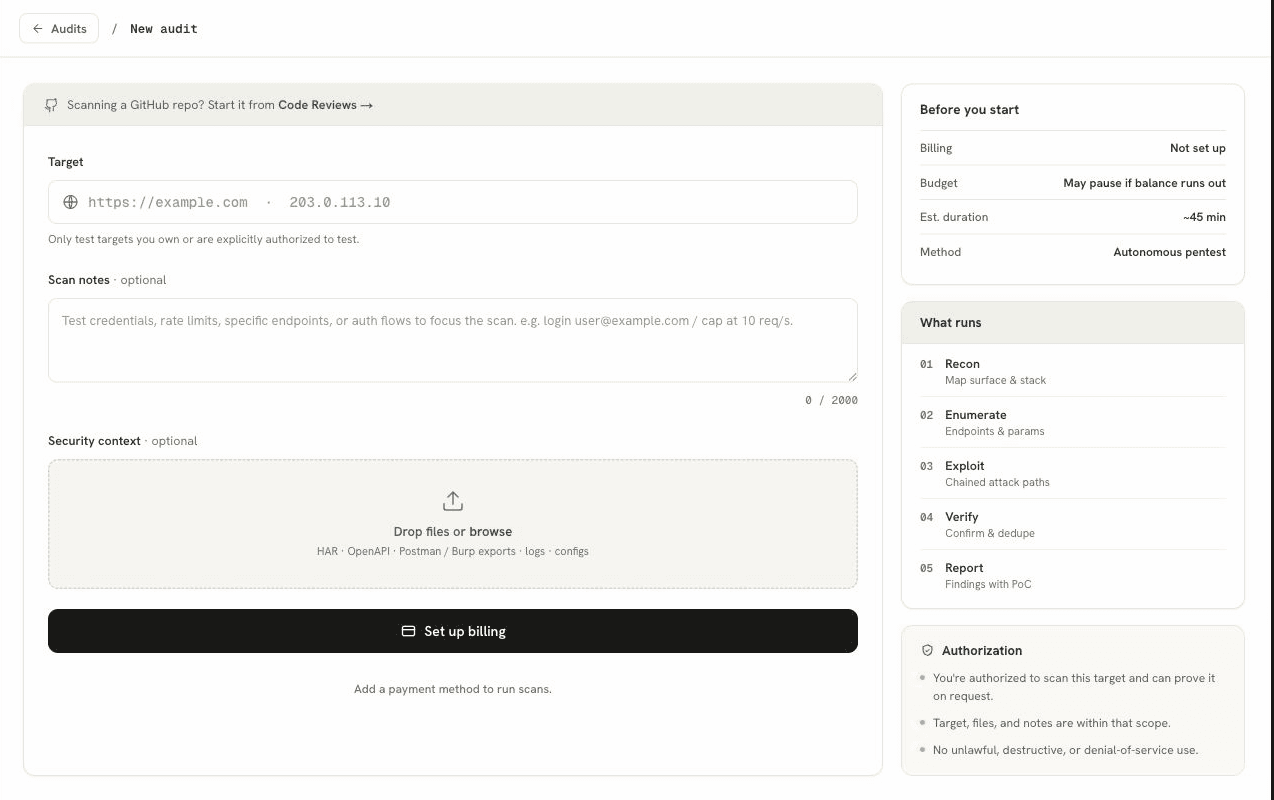
Open Audits, select New audit, and you will see the screen below. The left side defines the target and optional context. The right side explains the run and the authorization requirements.
Code Reviews
A GitHub repository follows a different workflow. Use Code Reviews for repository-backed analysis; use New Audit for a running website, application, API, or IP address.
Target
The required URL or IP address. Keep the target inside the scope you are authorized to test.
Scan notes
An optional text field for unusual constraints such as a hard rate limit, a specific role, or one area that must stay out of scope. We generally leave this blank and let the agents explore autonomously.
Security context
Optional supporting files, including HAR, OpenAPI, Postman or Burp exports, logs, and configs. For authenticated testing, upload the original, unsanitized HAR with cookies, authorization headers, tokens, and relevant request data intact.
Before you start
A quick account and run summary: billing or wallet state, what happens if the budget runs out, the estimated duration, and the autonomous pentest method.
What runs
The five stages of a BugBunny scan: Recon maps the surface and stack; Enumerate identifies endpoints and parameters; Exploit develops attack paths; Verify confirms and deduplicates results; Report packages the findings with proof of concept.
Authorization
A reminder that you must be authorized to test the target, that every uploaded file and note must belong to that scope, and that destructive or denial-of-service use is not allowed.
Start control
The main button reflects the account state. It asks for billing setup in the screenshot; an active account can start the security audit, while an empty wallet is prompted to top up.
For login context, the HAR must not be sanitized
A HAR records the actual browser requests made while you log in and use the product. That gives the agents concrete endpoints, methods, headers, cookies, request bodies, and application flows instead of a prose description of how authentication works.
If you want BugBunny to test authenticated functionality, capture the HAR while logging in and exercising the relevant area, then attach the original file under Security context. Do not sanitize it before uploading. The HAR must contain the session cookies, authorization headers, access or bearer tokens, CSRF tokens, and relevant request and response data. Removing those fields leaves the agents without the authenticated context they need.
HAR files can contain session cookies, tokens, and sensitive request data. Only upload one for a target you are authorized to test, and treat the file like a credential.
What about follow-ups?
BugBunny includes a follow-up function, but it is not central to the way we use the product. The system normally does well on its own, so we let the initial scan complete without trying to steer every decision from the chat box.
When we are unhappy with a result, we typically start another scan. A fresh run gives the autonomous system another independent pass over the target and avoids piling extra instructions onto a run that has already completed. Follow-ups are still available for a tightly scoped question, but they are the exception rather than the default workflow.
Our recommended default
Start with less prompting, not more: enter the authorized target, attach a complete, unsanitized HAR only when authentication context matters, and let BugBunny run through recon, enumeration, exploitation, verification, and reporting. Review the output, then launch a new scan if you want another pass.